Printfriendly


Hello loom knitters, today we are going to talk about that boring thing called gauge! Hopefully, I can make it mildly interesting since it's so important in all knitting. I'll go through it as quickly and concisely as possible.


What is gauge and why should I care about it?
Gauge is the number of stitches and rows used per inch. It determines the final size of your knitting. It is also referred to as tension. Although our pegs keep us "locked in", in a sense, each loom knitter works with a different tension, changing the size of our items sometimes dramatically. If you want your project to turn out like the given sample then you must meet gauge. The math doesn't lie!

How do I achieve proper tension?
Practice knitting with a medium tension on most projects. Your stitches should not be loose or tight. If you are having difficulty working your stitches then your tension is too tight. If your stitches are looking loose then you need to apply more tension. The most important thing for nice looking stitches is even tension. In lace, cable, etc. patterns often the designer will tell you to knit loosely for easier movement of the sts. In this case, follow the given directions to achieve proper tension.

How do I achieve the proper gauge of my pattern?
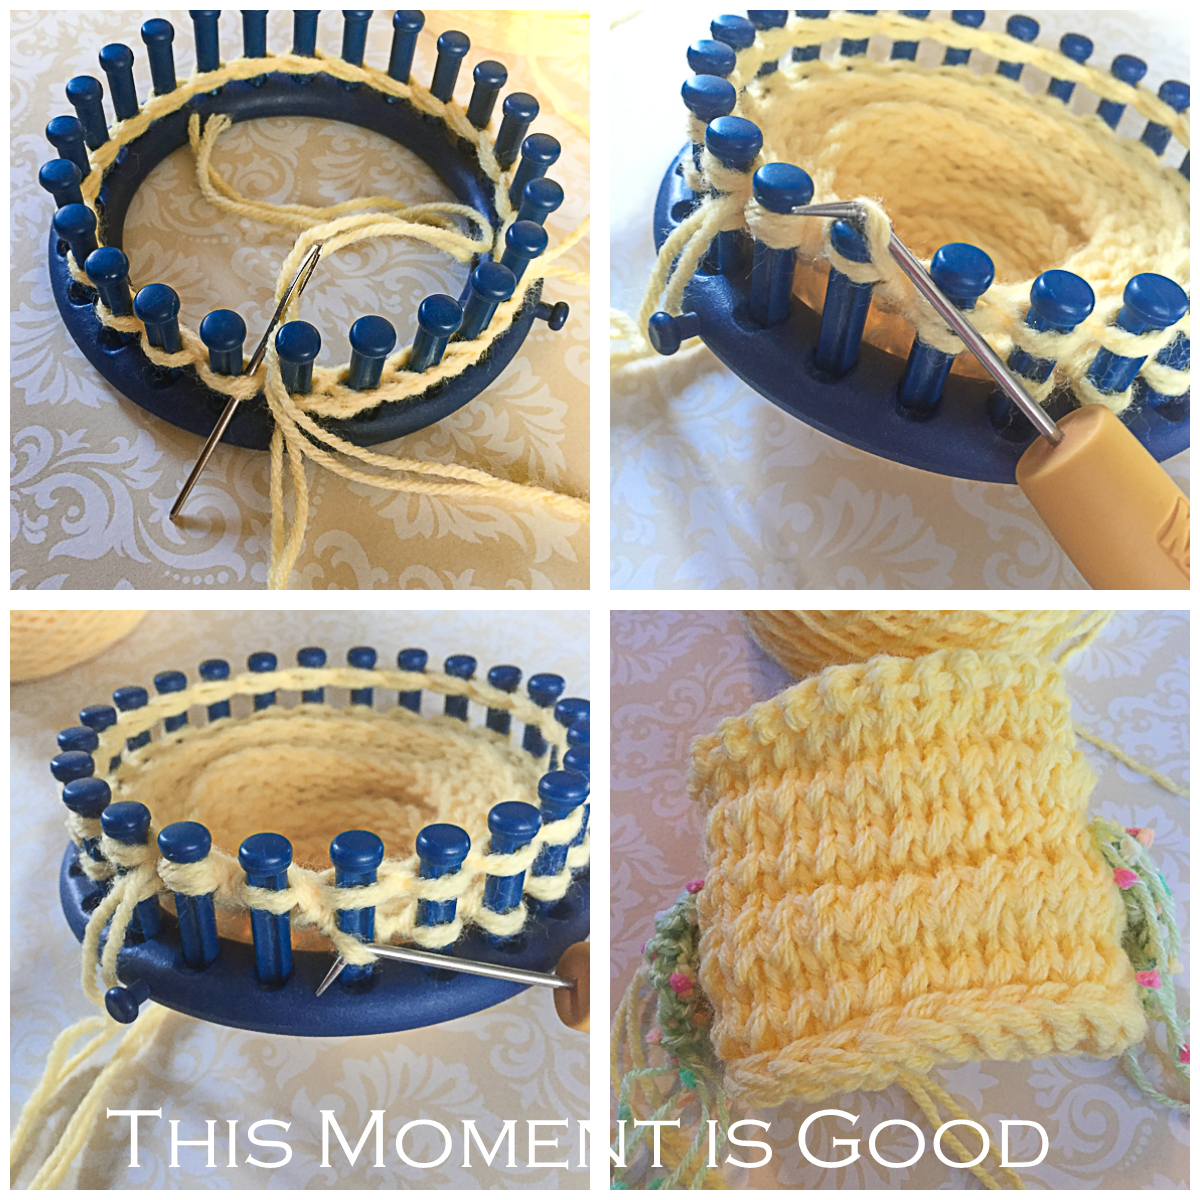
If doing a loom knitting pattern, you will knit a 4 x 4 or 5 x5 inch swatch using the given yarn and loom. If you are not doing a pattern and trying to design your own OR changing something in a designers pattern, then knit a swatch to determine how many stitches/pegs you will need. 

How do I determine how many stitches and rows needed?
Lay a ruler or gauge ruler on your swatch and count the number of sts you have (that's the horizontal row) in the 2-inch window. Then count the number of rows you have in the 2-inch window, this is the vertical row. Double those #'s and you will have the amount you'll need to complete 4 inches of your pattern. Most patterns give gauge in equivalents of 4 inches. 

The Math?? Really, it's not scary.
Example (colors indicate source):  If your gauge is 13 sts and 28 rows = 4" in Stockinette and you want to make a washcloth that is 12" x 12", how would you do that?

  • First divide 12" by 4". The answer is 3.
  • Then multiply 13 x 3. The answer is 39. You need 39 sts to create your width, 12 inches.
  • Now multiply 28 x 3. The answer is 84. You need 84 rows to create your length, 12 inches.
  • Math is power in knitting, once you understand it you can create your own designs or actually make things that fit!


Now that I know my gauge, how do I apply this to my pattern?
If you are doing a published pattern and have met gauge then you are ready to knit your project! If your swatch is too large, you may be knitting too loose or using the wrong stitch. If you changed the yarn then the yarn may be too bulky for this project. If your swatch is too small then you may be knitting too tight or using too thin a yarn.

  • If your swatch is way off, your yarn, loom, and project probably don't go together. Don't try to force it.


Can I use a different loom and yarn to complete my pattern?
It depends. You can knit a swatch on your chosen loom and determine how many stitches/rows you would need to achieve the desired measurements of the finished object.
Things to keep in mind...

  • Stitch counts are very important. Most patterns have repeats so the number of sts used will have to fit into the repeat. More than likely you'll have to compromise on the size to achieve the proper stitch count.
  • Some objects have a necessary drape and won't have desirable results if made with lighter or heavier yarn to accommodate a different loom. Knit your swatch and see if you like the result.
  • Yarns knit very differently even if they are of the same fiber, ply and weight. 
  • The math does not lie so rely on it.
  • In loom knitting we talk a lot about pegs, each peg equals 1 stitch.
  • Complex shaped patterns are more difficult to change such as boots, slippers, lace shawls, etc. Make sure you have a clear understanding of gauge before attempting this.
  • Links to helpful information:  Converting Needle Knitting Patterns To The Loom and Converting Loom Patterns To Different Looms

Do I always have to worry about gauge?
No, sort of. Many of my earlier patterns do not even include gauge since they were written for a specific loom and yarn. This was done because the size wasn't crucial. Patterns that contain gauge usually expect you to knit a swatch and meet gauge. Items that don't require a specific fit, baby blankets, scarves, Christmas stockings, craft items, etc. can often be knit without worrying too much about gauge.

Thank you for reading and don't forget to check out our shop for beautiful loom knitting patterns and gifts for loom knitters!-Nicole


It's 2018 and I like most, am looking for ways to be healthier this year. Loom knitting can be a sedentary job so I'm trying to eat healthier and get on my spin bike a little more often. I'm doing a 30-day plant rich/Mediterranean diet and horrors, giving up candy. Candy is my addiction and I'm not a person that can just eat one piece. Each year I give up an unhealthy food, 2 years ago it was soda, last year it was hot peppers (that was hard but they tear up my stomach). I can only commit to 30 days without candy but I feel it was a start. I'm hoping that after the month, it will just continue. We shall see!

This soup was an experiment. I was looking for something different, plant-based and included healthy protein. What I came up with was an easy, fresh tasting, and best of all, healthy recipe. 

Fish Soup With Dill
Slow Cooker
Begin with the plants, asparagus, carrots, celery, potato, mushroom and spinach.

Fresh and freeze-dried spices add wonderful flavor!

Place veggies in the slow cooker
1 stalk celery
1 chopped portabella mushroom
1/4 cup spinach leaves
1 carrot
1/2 diced white potato
Baby asparagus (fresh), 3/4 inch pieces

Add liquid and Spices
whisk 1/2 cup almond milk (or reg milk) with 1-1/4 TB Flour
1 Tablespoon Freeze-dried or fresh dill
1/4 tsp pepper and salt
1 cup low sodium chicken broth/stock
1-1/2 cup water
Fresh oregano to taste (I used the leaves from 2 stalks)
1 tsp garlic paste
1 tsp pesto (jarred or fresh)

Cook on low for 4 hours

Add Fish and Cheese (fresh or frozen, thawed)
1 filet of Salmon
1 filet of Tilapia
8 large Shrimp
1/4 cup shredded fresh mozzarella
Cook on low for 2 more hours (6 total)

Pair it with some hummus and pita bread - Delish!

Enjoy!-Nicole


We loom knitters have been ignored for too long, so I have an exciting announcement for 2018. We now have gear designed just for loom knitters. We have T-shirts for men and women, mugs, project journals, project bags, and notions bags. The large project bags will accommodate the largest looms and we have zipper pouches that can protect a small loom and a skein of yarn or small ones to hold all of your tools. These make perfect gifts for the loom knitter! I've designed all of the artwork and have even done a sheep painting for one of the designs. You can click the pictures and you'll be taken to our Etsy shop or Click Here for more info!

Please let me know what you think in the comments below and products you would like to see in the future! Thank you for reading-Nicole


Loom Knitting project bags and tool bags. These will hold all of your looms, yarn and notions!

Loom knitter's T-Shirts are available in up to 10 colors and ladies fitted or unisex fit!

Enjoy a cup of coffee or tea while showing off your pride in loom knitting!


loom knit chick, loom knit easter pattern, loom knitting, free loom knitting patterns, loom knit chicken, loom knit amurigumi, loom knit easter patterns, Easter patterns, easter chick, easter bunny


Easy Bunny has a new friend and his name is Easy Chick! He's a loom knit chickadee and instead of being made from a flat rectangle he's made from a simple tube. For those who have never picked up stitches in your knitting, you're going to love the ease of this because it means no seaming. Yes, I said it, no seaming is needed on this sweet, easy chick. These can be completed in less than an hour so think about making them in different colors and filling a bowl of little chicks for your coffee table (they do resemble large eggs).
loom knit chick, loom knit easter pattern, loom knitting, free loom knitting patterns, loom knit chicken, loom knit amurigumi, loom knit easter patterns, Easter patterns, easter chick, easter bunny
#freeloomknittingpatterns #loomknittingpatterns #Easter #Easterloomknittingpatterns #knitchick #loomknitchick #chicken #knitchicken #loomknit #loomknitting


Loom Knit Easy Chick Pattern

Supplies

  • Loom:  Large gauge, 24 peg, 3/4" peg spacing round loom. (example Knifty Knitter, Boye, Nicole, CinDWood). Loom used pictured below. Please remember: In loom knitting, brand of loom does not matter but peg spacing and peg numbers do, if you want a similar result.
  • Knitting Tool
  • Crochet Hook
  • Measuring Tape
  • Poly-fil (for stuffing chick)
Finished Measurements:  10-1/2" around x 4-1/2" high.
loom knit chick, loom knit easter pattern, loom knitting, free loom knitting patterns, loom knit chicken, loom knit amurigumi, loom knit easter patterns, Easter patterns, easter chick, easter bunny
Pattern Notes
  • For decoration only. This was not designed as a toy, the knitting will not be tight enough to hold the fiber-fil inside if used for this purpose. If you wish for the stuffing to stay tightly inside then line chick using a muslin/fabric sack and place poly-fil inside. Also please secure eye yarn well as this could be a choking hazard for children under 3 years old.
  • 2 strands of worsted weight yarn are held throughout pattern for all elements of chick except headdress.
Yarn:  Main Color and Body of Chick:  Pounds of love, Lion Brand Acrylic, used in sample, 2 strands held as one, worsted #4 weight. Any worsted yarn will work with this pattern using 2 strands as one. Colors:  Yellow (Body)/Orange (Beak)
Wings of Chick:  Bernat Dippity Dot, worsted weight, #4, Color: Green. (2 strands as one)
Eyes:  Any black or dark grey, worsted weight. (Red Heart, Boutique Midnight #4 used, 2 strands as one, color:  Nightfall)


Key: 


Main Body of Chick

Preparation:  Take your yarn around the loom 1 and 1/2 times leaving a long tail for gathering before casting on. See Picture A below.
Foundation Round:  Chain Cast on all pegs and join to work in the round.
Now, use the long tail and thread it through a yarn needle, take the yarn through the loops on all pegs (similar to a gathered bind off but DO NOT remove loops from pegs), then leave it hanging until knitting is complete. See photo A below.
Rnds 1-2:  Knit
Rnd 3:  Knit
Rnd 4:  Chain one cast on around, then pull bottom loops over top loops. (This will create a ridge in your knitting giving your chick a unique texture and fluffy feel)
Rnd 5:  Ewk
Repeat rnds 3 through 5 until total knitting measures 4-3/4 inches.
Next 3 rows:  Knit
Bind off:  Use gather method. Do not gather the knitting yet, leave loose until wings and face are complete.

Finish:  Use Photo Tutorial Below.


Photo A: Main Body

  1. Picture 1 shows how to take your yarn through the loops on the pegs after casting on. This will give you a drawstring to close the bottom of your chick. A gathered bind off is done the same way except that you will take your loops off the peg as you go.
  2. Pictures 2 and 3 show you how to pull the bottom loops over the top loops after doing the chain one cast on in the middle of the row.
  3. Picture 4 is a photo of the chick after both wings have been completed. No seaming needed.


Wings and Beak
loom knit chick, loom knit easter pattern, loom knitting, free loom knitting patterns, loom knit chicken, loom knit amurigumi, loom knit easter patterns, Easter patterns, easter chick, easter bunny
  1. Place knitting inside loom, right side out.
  2. Wing:  Fold Knitting in half and find Center of knitting lengthwise. Pick up 3 stitches for wing. Make sure it's to the side of where you would like the front of your chick to be. Knit 10 Rows (using 2 strands as one in wing color), decrease the stitches to one stitch by doing a k2tog and ssk (Just move your stitches in one, knit together and repeat, making sure to decrease to the center stitch). Bind off. Repeat for the second wing. Increasing/Decreasing K2tog/Ssk Videos
  3. Beak:  Find center front of face after doing both wings. Pick up 2 sts. Beak should be even with wings. Knit 4 rows. Decrease to one stitch by moving peg 1 to peg 2, knit sts together. Bind off.
  4. Eyes:  Use 2 strands Black. Using the picture for placement. Take a needle and yarn and wind it twice around 2 ladders between the stitches; secure.
  5. Weave in all ends except cast on and bind off.
  6. Pull bottom closed and secure. Stuff chick so that he achieves desired shape. Pull top of head closed and secure. Weave in ends.
  7. Add Chicken Headdress Below.

Chicken Headdress
loom knit chick, loom knit easter pattern, loom knitting, free loom knitting patterns, loom knit chicken, loom knit amurigumi, loom knit easter patterns, Easter patterns, easter chick, easter bunny

  1. Gather some yarn in a 4-inch bundle.
  2. Tie Center of the bundle.
  3. Hold ties away from the bundle and trim to 1-1/4".
  4. Secure to center, top of the head.
Thank you for reading. Happy Looming-Nicole
2018 copyright, Nicole F. Cox, This Moment is Good, all rights reserved.


Please take a minute to check out our new gifts, t-shirts, totes and products just for loom knitters! Click the photo...


Powered by Blogger.